Wednesday, December 2, 2009

5th gear tune up...

Yesterday, I tuned the 5th gear. The pin shown on the picture prevents the selector (In the gear box) to go too far and to catch the reverse fork. To get the reverse fork, the lifting of the selector above the pin permits to grab the reverse fork.


Reinstalling the cover was not a walk in the park.


A magnetic screw driver is needed to reinstall the cover. I used petroleum jelly to stick the screw at the end of the screw driver.


Thursday, November 19, 2009

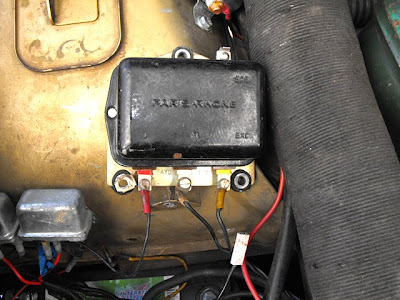
Ford regulator...

I have replaced the voltage regulator with a new electronic Ford regulator.

For a show car it might be worth to spend the $200 for an original looking one. This one was less than $11.


Wednesday, November 18, 2009

Rear bearing, fuel pump.

The rear bearing are humming. Someone try to open the dust cover and made a hole. The grease probably escaped and the moisture got in.


Dry as a bone.


I used a needle to inject some grease; hopefully this will help. I hope I don't have to change the bearings.

I got stuck again on the road. The fuel filter was clogged. I removed the filter near the pump and put it in the trunk.


I used pvc pipes to avoid the hoses to be crushed.


The owner can monitor the filter and eventually change it without any tools.


This is a temporary setup until the tank gets cleared up. Then, the filter can go back near the pump.


Tuesday, November 10, 2009

New starter

Here is the new starter:

Much smaller and liter than the original one (Almost 10 Kg less).


Monday, November 2, 2009

Fuel pick up and pressure

While testing the car, I got stuck. Turned out that the fuel pickup got clogged. The screen was already removed.

I have removed the end piece and cut the metal pipe like the end of a epidermic needle and made 2 holes on the other side to avoid suction in case of piece of dirt getting close to it.


Now, I am getting 4.5 psi at the carbs.


Sunday, November 1, 2009

Synchronization of the carburators...

Thursday, October 29, 2009

Electrical, resetting tach for the Buick distributor.

The fans did not go on. Some rust prevented the relay to operate.


Going through the electrical system and getting the car roadworthy. The high beam just needed some soldering.


For some reason I could not get the ground at the upper right screw, but the ground was OK on the other one. I just had to make a little connection.


Here is the reason why the right side parking light was not working. The assembly is pretty much in new condition. It would be tough to find and costly to replace. Also, the metal doesn't take the solder. I just put a steel wire through to secure it.


A nice way to clean a spark plug...


... using a spot blaster.


Since the engine is working on one coil instead of two, the tachometer is getting 6 pulses instead of 3. That can be corrected by turning the potentiometer clockwise using the access hole under the label.


Thursday, October 22, 2009

Buick distributor.

Well, I won't be using the condensers because I have purchased a Buick distributor modified and sold by John Titus. Finally, a good, maintenance free and reliable ignition for the SM!
John's directions are very detailed and easy to understand. The installation of the distributor was a breeze and I got it right the first time. Now the engine runs like a charm.

The Buick distributor on the left. I just had to remove the pin and the gear from the original distributor and installed it on the Buick one. I had to add a shim (washer) to be within the shaft play specs that John specifies.


TDC1 at compression, align the index of the rotor to the white paint mark on the border of the distributor; slightly to the right side of the car.


Aligning the reluctor according to a schematic provided by John.


I used the leftover tab from the SEV condensers I bought to connect to the coil. I will use the other one to add a condenser on the + side for noise reduction.


Done! The engine runs great now!


John Titus provides a lot of "SM solutions". If you have an SM and don't want to spend a lot of money fixing it, go to John's web site:
http://www.citroen-sm.org/wiki/index.php/Marketplace:John_Titus

Thursday, October 8, 2009

Point condensers...

I bought some condensers from Dave Burnham (Marchal for Renault R5, 8, 10, 12, 16 and 18; ref S9 430 60803).
I've disordered the top tabs on the original condensers, cut most of the threaded pole on the new one and soldered the tabs on the top.


Wednesday, October 7, 2009

Buick distributor, master cylinder...

Yesterday, I rebuilt the clutch master cylinder.
I used an extractor to remove the pin; worked like a charm.

I have honed the cylinder with an 18mm 320 grid honer.

Nice cross-hatch pattern.


The new cups came from Jerry Hathaway (SM World).


In place...


Works great. I tuned the pedal and placed the fender back on :o)

Tuesday, September 29, 2009

Carbs...

I looked inside the oil pump to count the amount of washer, just in case I would like to change the oil pressure later.
I have also took dimensions to make a tool if I need too. Always wondered why the drain hole is so big? Well, it's to get the tool through in order to modify the oil pressure.
Used blue loctite on the nut and, this time, I folded the tab correctly ;o)
Actually, the loctite is important; some people do not use the tab washer.

Ready to close it up.


I've painted a dot on the PMH (TDC) and the 5 degree mark, and a line on the 30 degree mark.


20 years in storage, the carbs are very dirty with varnish and the pumps are leaking inside when the engine is running.


New and improved grose jets (Manufactured by John Titus and designed by
Ansel B. Grose); The ball turns randomly and never develops a groove. In addition, this can close the fuel intake if the fuel pump delivers higher pressure (In case of after market fuel pumps).

John Titus designed the SM gear reduction starter and coming soon, the DS gear reduction starter for ALL 5 main bearing engines, including 66-69 with large tooth flywheel.

Installation instructions:
"To ensure gasket remains centered on valve, place gasket on valve and tighten valve finger tight with valve threads facing upward (use grease to hold gasket in place). Invert cover and tighten valve to specifications. Adjust float as usual."

I have replaced the screw by a stud to facilitate the intake manifold removal and installation.


Now it is time to start the engine again. I have hooked up the oiler and a oil pressure gage (See earliest posts).
The oil showed up at the oil filter, then at the cam shaft. It's time to install the cover, shut off the oiler and start the engine.
Now running and the oil pressure is good...
Ignition and carbs are not tuned up yet. The engine should sound better soon...